

Analysis of the whole process of sonic detection pipe installation, practical points to avoid common construction problems:
In pile foundation projects, the installation quality of sonic detection pipes directly affects the accuracy and reliability of pile foundation integrity detection. If the installation is improper, it will not only lead to deviations in the detection data, but may even affect the progress and safety of the entire project. Therefore, mastering the practical points of the whole process of sonic detection pipe installation and avoiding common problems are the key to ensuring the quality of pile foundation projects. The following will analyze each link of sonic detection pipe installation in detail from construction preparation to final acceptance.
1. Construction preparation stage
(I) Material and equipment inspection
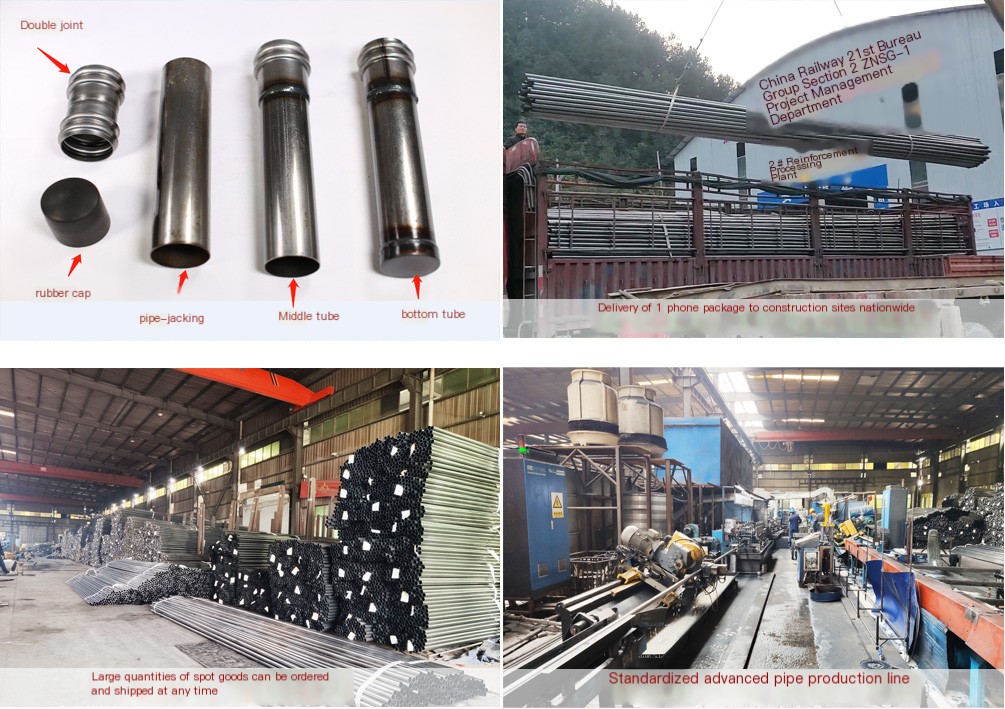
Verification of sonic detection pipe material and specifications: Strictly check the material of the sonic detection pipe according to the design requirements, such as steel pipe, plastic or rubber, to ensure that it meets the engineering standards. At the same time, check the specifications of the sonic detection pipe such as pipe diameter and wall thickness. The pipe diameter should be 10-20mm larger than the diameter of the ultrasonic detection transducer, and the wall thickness should meet the side pressure requirements of concrete pouring. For example, in large pile foundation projects, the wall thickness of the steel pipe sonic detection pipe should be above 3.0mm. In addition, check whether there are cracks, sand holes, deformation and other defects on the surface of the ultrasonic test tube to avoid using unqualified products.
Inspection of connection parts: For ultrasonic test tubes with different connection methods, check their connection parts accordingly. For threaded ultrasonic test tubes, check whether the threads are complete and undamaged; for flanged ultrasonic test tubes, check whether the flanges, bolts and sealing gaskets are complete, and whether the material and performance of the sealing gaskets meet the requirements; for welded ultrasonic test tubes, prepare suitable welding rods and check their quality.
Preparation of construction equipment: Prepare the required equipment according to the installation process, such as electric welders for welding, wrenches for threaded connections, etc. Debug and maintain the equipment to ensure its normal operation during the construction process to avoid equipment failure affecting the construction progress.
(II) Construction site planning and cleaning
Site layout planning: Reasonably plan the construction site, determine the storage area, processing area and assembly location of the ultrasonic test tube with the steel cage, ensure coordination between the areas and do not affect the construction operation. At the same time, plan the transportation channel to ensure that the ultrasonic test tube and the steel cage can be smoothly transported to the pile hole position.
Site cleaning: clean up the debris, soil and water around the pile hole, and keep the construction site flat and clean. Avoid debris falling into the pile hole during installation, which will affect the installation of the acoustic detection tube and the quality of the pile foundation.
2. Assembly stage of acoustic detection tube and steel cage
(I) Positioning and fixing of acoustic detection tube
Positioning method: Determine the position and number of acoustic detection tubes on the steel cage according to design requirements. Generally speaking, when the pile diameter is not more than 0.8m, two acoustic detection tubes are arranged; when the pile diameter is greater than 0.8m and not more than 1.6m, 3 are arranged; when the pile diameter is greater than 1.6m, 4 are arranged. Use a tape measure and a marking pen to accurately mark the installation position of the acoustic detection tube on the main reinforcement of the steel cage to ensure that the acoustic detection tube is evenly distributed along the circumference of the pile body.
Fixing method: Use iron wire, U-shaped card or special clamp to fix the acoustic detection tube on the main reinforcement of the steel cage. The fixing spacing should not be too large, generally about 1-2m. The joints and the bottom of the steel cage should be fixed more tightly to prevent the acoustic detection pipe from loosening and shifting during transportation and lowering. Pay attention to moderate force when fixing to avoid damaging the acoustic detection pipe.
(II) Acoustic detection pipe connection operation
Threaded connection: Clean the threaded ends of the two acoustic detection pipes, apply an appropriate amount of sealant, and then screw the end with the external thread into the end with the internal thread, and tighten it with a wrench to ensure a tight connection and reliable sealing. After connection, check whether there is a gap at the threaded connection to prevent mud from penetrating into the interior of the acoustic detection pipe.
Flange connection: Weld or bolt the flanges to the ends of the two acoustic detection pipes, place sealing gaskets between the flanges, and then connect the two flanges with bolts, tighten the bolts symmetrically and evenly to ensure the sealing and firmness of the flange connection. Pay attention to check whether the sealing gasket is intact and whether there is any misalignment.
Welding connection: Use arc welding or argon arc welding for welding. Before welding, align and straighten the connection ends of the sonic detection tube to ensure that the weld is flat and uniform. During welding, control the welding current and welding speed to avoid welding defects such as burn-through, slag inclusion, and pores. After welding, grind the weld, check the weld quality, and ensure welding strength and sealing.
Socket connection: Clean the socket end and the socket end of the sonic detection tube, apply sealant on the inner wall of the socket end, and then insert the socket end into the socket end. The insertion depth should meet the design requirements. Use special tools to fix the socket part to ensure a firm connection and prevent the sonic detection tube from falling off.
III. Lowering stage of steel cage and sonic detection tube
(I) Inspection before lowering
Overall inspection: After the steel cage and sonic detection tube are assembled, conduct a comprehensive inspection of the overall structure. Check whether the sonic detection tube is firmly fixed, whether the connection part is well sealed, and whether there is any damage or deformation. At the same time, check whether the size and shape of the steel cage meet the design requirements and whether the connection of the steel bars is firm.
Internal inspection of the sonic detection tube: Use a searchlight or other tools to check whether the inside of the sonic detection tube is unobstructed and whether there is any debris blocking the inside of the sonic detection tube. If foreign matter is found inside, it should be cleaned up in time to ensure that the transducer can pass smoothly during the test.
(II) Key points of lowering operation
Lowering speed control: Use a crane or other lifting equipment to slowly lower the steel cage and the sonic detection tube into the pile hole. During the lowering process, the lowering speed should be controlled and should not be too fast to avoid damage caused by collision between the sonic detection tube and the hole wall due to excessive speed. Generally, the lowering speed is controlled at about 0.5-1m/min.
Prevent tilting and collision: During the lowering of the steel cage, keep it in a vertical state to prevent tilting. At the same time, pay attention to the distance between the sonic detection tube and the hole wall to avoid friction or collision between the sonic detection tube and the hole wall. If the steel cage is found to be tilted or there is a risk of collision with the sonic detection tube, the lowering should be stopped immediately and the position should be adjusted before continuing to lower.
Segmented lowering treatment: When the steel cage is long and needs to be lowered in sections, the acoustic detection pipe should be connected and sealed accordingly at the segmented connection to ensure the continuity and sealing of the acoustic detection pipe. After the connection is completed, check the status of the acoustic detection pipe again, and continue to lower it after confirming that it is correct.
IV. Protection and acceptance after the installation of the acoustic detection pipe
(I) Post-installation protection measures
Pipe mouth closure: After the acoustic detection pipe is lowered to the design elevation, the pipe mouth is immediately sealed. Special pipe caps, wooden plugs or steel plates can be used to seal the pipe mouth tightly to prevent mud, debris, etc. from falling into the acoustic detection pipe during the subsequent construction process, causing blockage.
Prevent external force damage: Set warning signs around the pile hole to remind construction personnel to pay attention to protecting the acoustic detection pipe and avoid external force damage to the acoustic detection pipe due to mechanical operations or personnel activities during the construction process. At the same time, during the concrete pouring process, avoid the vibrator directly touching the acoustic detection pipe.
(II) Acceptance work
Appearance inspection: Check whether the installation position and quantity of the acoustic detection pipe meet the design requirements, whether the surface of the acoustic detection pipe is damaged or deformed, and whether the connection parts are firm and well sealed. Check the fixation of the acoustic detection pipe and the steel cage, and whether the fixing points meet the requirements.
Sealing test: Use water injection test or air pressure test to test the sealing of the acoustic detection pipe. Inject water into the acoustic detection pipe and observe whether the water level drops. If the water level remains stable, it means that the acoustic detection pipe is well sealed; or pass a certain pressure of gas into the acoustic detection pipe to detect whether there is any leakage.
Record and data collation: Record various data and situations during the installation of the acoustic detection pipe in detail, including material inspection records, installation process records, acceptance records, etc. Organize relevant information to form a complete installation file to provide a basis for subsequent pile foundation testing and project acceptance.
V. Common construction problems and solutions
(I) Blockage of acoustic detection pipe
Cause analysis: The pipe mouth is not tightly closed, causing mud, debris, etc. to enter the acoustic detection pipe; the connection part of the acoustic detection pipe is not well sealed, and mud penetrates into the acoustic detection pipe during the concrete pouring process; the acoustic detection pipe is squeezed and deformed by external forces during installation, causing internal blockage.
Solution: Strengthen the management of pipe mouth closure to ensure that the pipe mouth is tightly sealed; when connecting the acoustic detection pipe, strictly follow the operating procedures to ensure the sealing of the connection part; during the installation and subsequent construction of the acoustic detection pipe, take effective protective measures to prevent the acoustic detection pipe from being damaged by external forces. If the acoustic detection pipe has been blocked, it can be treated by high-pressure water flushing, dredging with a dredge, etc. If the blockage is serious and cannot be dredged, the acoustic detection pipe needs to be reinstalled.
(II) Deformation of acoustic detection pipe
Cause analysis: The material of the acoustic detection pipe does not meet the requirements and the strength is insufficient; it is subjected to external forces such as collision and extrusion during transportation and installation; the steel cage is lowered too fast, and the acoustic detection pipe collides with the hole wall.
Solution: Strictly control the material and quality of the acoustic detection pipe, and select products with strength that meets the requirements; during transportation and installation, strengthen the protection of the acoustic detection pipe, handle it with care to avoid collision and extrusion; reasonably control the lowering speed of the steel cage, keep the steel cage vertically lowered, and prevent the acoustic detection pipe from colliding with the hole wall. For slightly deformed acoustic detection pipes, plastic tools can be used for repair; if the deformation is serious, a new acoustic detection pipe should be replaced.
(III) Leakage at the connection of the acoustic detection pipe
Cause analysis: Improper selection of connection method, not meeting the project requirements; unqualified quality of connection parts, such as aging and damage of sealing gaskets; non-standard connection operation, uneven tightening of bolts or poor welding quality.
Solution: Select a suitable connection method according to the project characteristics and design requirements; strengthen the quality inspection of connection parts to ensure that the performance of components such as sealing gaskets meets the requirements; during the connection process, strictly follow the operating procedures to ensure the sealing of the connection parts. For leaking parts, the bolts can be retightened, the sealing gaskets can be replaced or repaired.
The above analyzes the installation process and key points of the acoustic detection pipe from many aspects. If you have any questions about the details or focus of the article, or want to add installation knowledge for specific scenarios, please feel free to let me know.